This post is in no way sponsored by anyone. I took a break from blogging and now my stats are not legit enough to warrant sponsorship. ;) I am not being paid to tell you the following things, I am only telling you so that your life may be enhanced.
I'm going to tell you about two of my favorite things. One I have loved for a long time, one I just found. Do you know what stumbleupon is? That's not a typo, it's a website. Stumbleupon is magical because it's sort of like Pandora for websites. You thumbs-up or -down sites as the generator "stumbles" you through them. You can spend as much time as you want on any site. You can find all the ones you've "liked" later. The more you thumbs-up and -down, the more the site gets to know your likes and dislikes and before you know it, almost every single site you stumble upon is AMAZING! It's like having the entire internet at your fingertips. You find pages you didn't even know you were looking for. I have enjoyed myself a good stumble for years, now. In fact, you can find a stumble button at the top of this page and feel free to click it and recommend my site so others on the internet might stumble upon it. Do yourself a favor, check it out.
I just experienced my first 2 minute guided relaxation. If you've never done any sort of guided relaxation or meditation before, let me just tell you that you are missing out. I started doing them in a high school wellness class, and have since downloaded several, but they're all 30+ minutes long. Who has that kind of time in the day to just sit and listen to a soothing voice? Okay, probably me, but it seems like an awful big commitment. Long story short: I just found this site and it has changed my existence! (Or at least my day!) When you visit Calm.com, you are greeted by a beautiful scene with soothing sounds. You then select whether you would like a 2, 10, or 20 minute guided relaxation. I just did a 2 minute relaxation and I can't even describe how refreshed I feel! I guarantee you that we each have 2 minutes of our day that could be dedicated to making ourselves happier, healthier, and more productive. I remember from that high school health class that brief periods of true meditation or relaxation can do just that. Please join me in being less frantic, crabby, and anxious. THE WORLD IS A BEAUTIFUL PLACE, MY FRIENDS!
I hope you have two minutes available right now and can jump on over to calm.com and try it out. I also saw that they even have an app. I may have to look into that.
Enjoy your day!

Friday, March 15, 2013
Wednesday, March 13, 2013
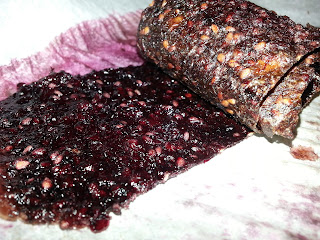
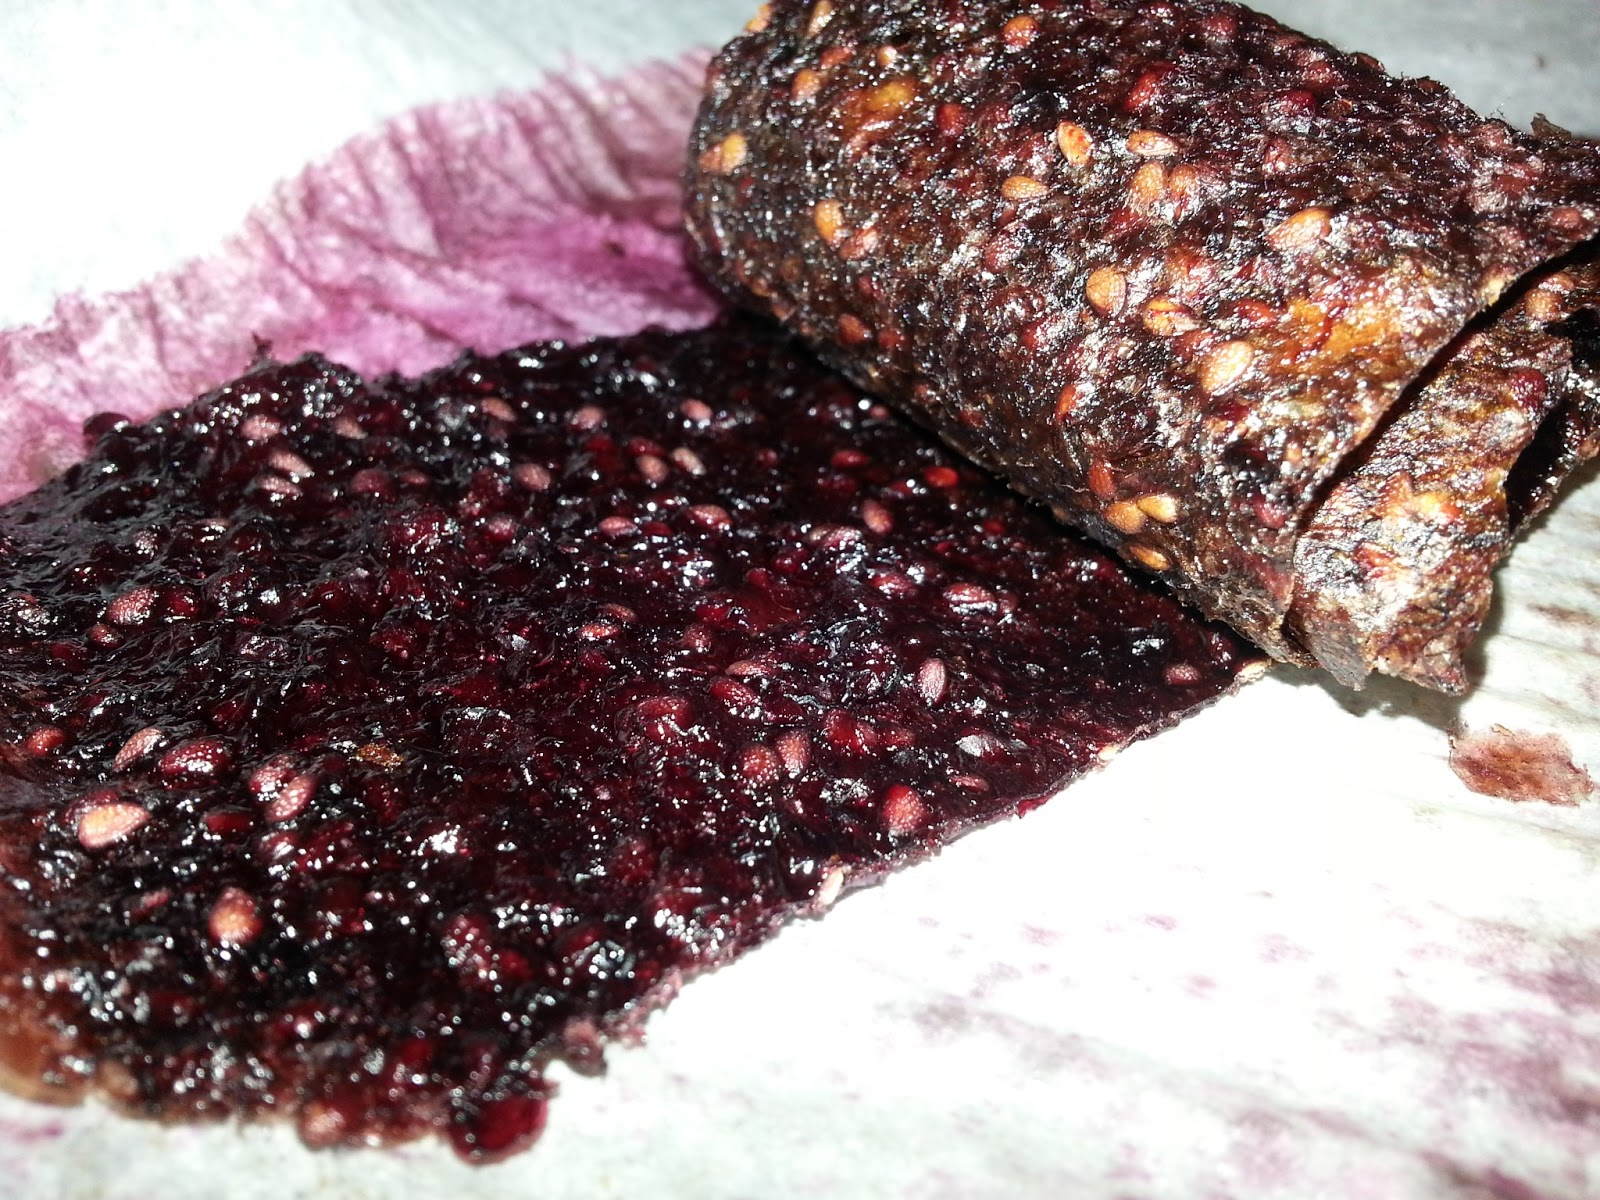
100% Real Fruit Roll-Ups
I confess, I have an addiction. I have eliminated ingredients I can't pronounce from my diet as much as I can on a very tight budget. I don't claim have the perfect diet, but I do what I can. My addiction: fruit roll-ups. I'm not kidding you, I could sit down and eat a whole box at any given moment. Do you know what are in fruit roll-ups? ME NEITHER! I am also trying to get more fruit and vegetables into my daily diet. My one stone for these two birds? 100% real fruit roll-ups.

Are you excited? You should be! Here's the tutorial:
 Step 1: Start with fruit. You can use any kind of fruit you want. Berries, grapes, bananas, apples, seriously, go nuts. I used blackberries and bananas, with a little grape juice squeezed in. I should tell you, my measurements are not precise... I am a cooking snacker. It's true. So here's what I did, but keep in mind, it is almost impossible to mess this up. So I used about 1 1/2 mason jars of blackberries and about 1 1/2 large bananas that were very ripe. I used 1 1/2 because I ate the other half while I was peeling them! Hahaha, I am really enjoying this post so far. (Are my perfectionist readers angry yet?) Put your fruit in a mediumish saucepan on the stove, low heat. I also squeezed a handful of grapes' juice over the fruit.
Step 2: Mash and mix. As the fruit warms, get out your favorite masher and mash!
 Once you have everything thoroughly mashed together it will look something like this. I am sure if you are more dedicated to hand-mashing than I am, you could mash to a smooth puree by hand. I do not have that many hours in the day, so once I got it to a rough mash, I whipped out the ol' hand mixer. Keep in mind, the hand mixer is going to be messy. VERY, EXTREMELY MESSY! I don't know if I'm just terrible at being clean, but I had berry goo all over my hand, shirt, mixer, and stove top. I am a messy cooker, but this was nuts. sheesh! I started at the lowest speed, went to medium for a while, then whipped it up to high for just a few seconds. Again, these things are not an exact science, I was just winging it until my puree looked like this:

Step 3: Slap it on a pan! Lay some parchment paper over a cookie sheet and spray it with non-stick spray. Do not skip this step. Trust me. It lifts off so easy when sprayed. Use the back of a spoon or spatula to spread the mix evenly. My pot of fruit made about 2 cups of puree, which was the perfect amount for my large cookie sheet. Spread evenly, so as to avoid thin spots which will become crunchy rather than chewy and roll-up-y.

 If it stops feeling squishy, and is crunchy, you've gone too far or spread too thin. I'm not 100* sure, but I bet if you squeezed some fresh juice over it (think grape or apple) and let it set (covered) for a while, you could probably moisten it back up some.
I am not perfect, so I always have a few crunchy spots. I tear them apart from the nice chewy bits and put them in a baggy to crumble over oatmeal or yogurt later.
When your roll-ups are finished cooking, pull the parchment paper to a cutting mat and use a pizza roller to slice into rolls. All that's left is to roll 'em up and enjoy! I would love to hear about the fruit combos you choose to try!
So, what do you think? The pictures were a little better, huh? In other news, I GOT ENGAGED THIS WEEKEND!!!! I'm so happy, and since my wedding will (obviously) be almost completely hand-made DIY projects, you can expect plenty of pretty new projects coming your way. I am one happy gal!

 [Linked up at:
  , Under $100 Linky Party ]

Are you excited? You should be! Here's the tutorial:
 Step 1: Start with fruit. You can use any kind of fruit you want. Berries, grapes, bananas, apples, seriously, go nuts. I used blackberries and bananas, with a little grape juice squeezed in. I should tell you, my measurements are not precise... I am a cooking snacker. It's true. So here's what I did, but keep in mind, it is almost impossible to mess this up. So I used about 1 1/2 mason jars of blackberries and about 1 1/2 large bananas that were very ripe. I used 1 1/2 because I ate the other half while I was peeling them! Hahaha, I am really enjoying this post so far. (Are my perfectionist readers angry yet?) Put your fruit in a mediumish saucepan on the stove, low heat. I also squeezed a handful of grapes' juice over the fruit.
 Step 2: Mash and mix. As the fruit warms, get out your favorite masher and mash!


(Since I used Blackberries, mine are quite seedy. I don't mind the seeds. If you do, choose a less seedy berry, like blueberries, or other fruit.)

Step 4: Pop it in the oven. Set your oven to the lowest temperature. I have the oldest, ugliest, crappiest electric oven on the PLANET. My lowest temp setting is 200*, but there's also this ambiguous "warm" temp... I went somewhere between 200 and warm. Between 150* and 175* is ideal. Leave your oven open just a little. Again, my oven is the worst, so it will only hold itself closed, halfway open, or completely open... ARGGGG! ...so anyway, I stuck a wooden spoon in the door to keep it open just a crack. You have to let some of the moisture out. The cooking process will take about 5 hours... It can take more or less than that depending on what fruit you use. You have to keep an eye on it starting at around 4 hours. When you're done, the roll-ups will be a nice, dark color. Poke it as you go. It should feel slightly squishy but not sticky when it's done.
 If it stops feeling squishy, and is crunchy, you've gone too far or spread too thin. I'm not 100* sure, but I bet if you squeezed some fresh juice over it (think grape or apple) and let it set (covered) for a while, you could probably moisten it back up some.
I am not perfect, so I always have a few crunchy spots. I tear them apart from the nice chewy bits and put them in a baggy to crumble over oatmeal or yogurt later.
When your roll-ups are finished cooking, pull the parchment paper to a cutting mat and use a pizza roller to slice into rolls. All that's left is to roll 'em up and enjoy! I would love to hear about the fruit combos you choose to try!
So, what do you think? The pictures were a little better, huh? In other news, I GOT ENGAGED THIS WEEKEND!!!! I'm so happy, and since my wedding will (obviously) be almost completely hand-made DIY projects, you can expect plenty of pretty new projects coming your way. I am one happy gal!

 , Under $100 Linky Party ]
Thursday, March 7, 2013
WHAT DID I JUST DO?!
Can I tell you about the scariest moment in my life? This is coming from the girl who has brought you the need of ER frequent flier miles, who moved across the country alone, and who has lived in the woods with bears, cougars, who-knows-whats, and NO ELECTRICITY for the last 20 summers... The scariest moment of my life was looking at an empty "My Pictures" file on my computer. The phrase "This folder contains no files" will be permanently imprinted upon my brain. My chest got tight and my eyes filled to the brim. I accidentally texted my boss that I was freaking out about it. That was supposed to go to Mainah, but in my panic moment, I sent it to the woman who has left her child alone with me... cute. She, however, is apparently a problem-solver, because while I was apologizing that I sent that to the wrong person, she was suggesting that there had to be a way to recover the files. It turns out, she's right. It was a little tricky figuring out how to do it, so I made a step-by-step tutorial video. Pin it or bookmark it, do whatever it takes to have it somewhere easy to find when you have that moment of "WHAT DID I JUST DO?!" and you need to get those files back. My pictures are back in the folder (though I did lose some of the folder reorganization I had been working on this afternoon).
Anyway, here is the step-by-step tutorial video:
P.S. By the time Mainah did respond, I had finished filming the tutorial and was in upload mode... His response: "It's okay babe. Are they in your recycle bin?" I love a man that can keep a cool head, but OBVIOUSLY THEY ARE NOT IN THE RECYCLE BIN OR I WOULDN'T HAVE TEXTED YOU IN A FRENZY! I thank God daily for that fella.
Wednesday, March 6, 2013
Don't call it a comeback ... or do.
Well, well, well... What do we have here? A mighty neglected blog, I would say. You've been weighing on my heart recently, blogfans, and I am here to officially announce that I'm back in action. It has been over a year since my last post, and I just can't believe it. I've got some big announcements coming up and plenty of blog ideas / projects that I've piled up while I didn't have time to actually sit and write the posts.
Disclaimer: This next chunk of yada yada yada is going to be aaaaaall about my life for the last year. For the shoe tutorial, scroll down a little bit.
Last winter, things got a little overwhelming trying to balance work, blogging, and being a full-time biology major. There was no time for blogging at the end of Spring term, because it was off to camp I went. I spent my 20th summer at camp as an admin at a super amazing Girl Scouts camp, and I'm going to another one this summer! Yay! After camp last summer, I moved to southern Oregon with the fella (we'll call him "Mainah", since he is indeed from Maine and sometimes gets a really cute New England accent... especially when he says "wicked" instead of "really"). We live in the smallest apartment outside of Manhattan. Okay, it's not that small, but it requires imaginative, functional decorating. People say to us all the time, "There are only two of you! How much room do you really need?" That question does not earn a response from me. I have a craft closet of sorts that is overrun with camping equipment. I finally found my desk/worktable surface under the avalanche of who-knows-what that was piled on it for far too long. We are fairly settled right now, and since I'm headed back to camp in 3 months, there's no better time to get this show on the road. I have missed blogging almost every single day since my last post. I am not going to promise daily posts, but I will make some commitments to myself and my blog:
Dip-dyed Shoes
I should start by telling you that as a "camp person" I have worn an unreasonable amount of tie-dye in my life. Do you remember that weird period in the late 90's when tie-dye wasn't cool and it made you look like a throwback 70's weirdo? Yeah... I was that kid. Flash forward to the 2000's and it came back! It's starting to fade a bit in popularity again (to my dismay), but there is a sweet newish trend --Ombre-- that everyone is loving right now. I think these shoes make a great transition for people who love the hand-crafted effect, but have less of a HEY-LOOK-AT-ME-I-JUST-CAME-HOME-FROM-SUMMER-CAMP look.

 To start, all you need is a couple of pairs of canvas sneakers (I picked mine up at Goodwill for $1/pair), some dye (I like the liquid Rit dye because it's so easy to manipulate the "strength" of the color, and because it comes in real colors people wear, not just lime green and hot pink). You may also choose to use a "dipping container" rather than just filling a sink or bucket. It allows you to waste a LOT less of the dye. I used empty bottles out of the recycle bin.
 Step 1: Remove laces and anything else you don't want colored. I left the insoles in, but you could snatch those out if you don't want them to have the ombre effect. I will say that I wore dark socks for about the first week I wore them just in case, but I never noticed any dye bleeding.
 This (and the pic at the top) is as close as I have to a good "after" shot. I promise I will get better at taking pics, and I can't apologize enough for the quality. Please give it a shot because these pics don't do it justice. I would love to see some of your creations (and photography skills)!
Thanks for sticking with me through this post, I'm a little rusty, but it's great to be back. I would love to hear what you think. I'm going to be posting crafty, foodie, and who-knows-what-else in the near future, so stop back by. Feel free to "follow" so you can keep up with all my adventures. If you enjoyed the tutorial, please share!
[Linked up to: Make It Wear It Thursday Transformation Thursday Under $100 Linky Party


It's a Party Hookin' up with HOH ]
Disclaimer: This next chunk of yada yada yada is going to be aaaaaall about my life for the last year. For the shoe tutorial, scroll down a little bit.
Last winter, things got a little overwhelming trying to balance work, blogging, and being a full-time biology major. There was no time for blogging at the end of Spring term, because it was off to camp I went. I spent my 20th summer at camp as an admin at a super amazing Girl Scouts camp, and I'm going to another one this summer! Yay! After camp last summer, I moved to southern Oregon with the fella (we'll call him "Mainah", since he is indeed from Maine and sometimes gets a really cute New England accent... especially when he says "wicked" instead of "really"). We live in the smallest apartment outside of Manhattan. Okay, it's not that small, but it requires imaginative, functional decorating. People say to us all the time, "There are only two of you! How much room do you really need?" That question does not earn a response from me. I have a craft closet of sorts that is overrun with camping equipment. I finally found my desk/worktable surface under the avalanche of who-knows-what that was piled on it for far too long. We are fairly settled right now, and since I'm headed back to camp in 3 months, there's no better time to get this show on the road. I have missed blogging almost every single day since my last post. I am not going to promise daily posts, but I will make some commitments to myself and my blog:
- I will post at LEAST once a week, by Saturday night. Rain or shine, there's going to be some magic.
- I will practice my "blogtography" skills. I am by no means a photog and it shows... I'll try to make my pics as pain-free to look at as possible.
- I will remember that this blog is a creative outlet and journal of sorts. Not pressure, no stress, just fun.
On to the good stuff... I would love to share with you some of my favorite projects from the past year!
Dip-dyed Shoes
I should start by telling you that as a "camp person" I have worn an unreasonable amount of tie-dye in my life. Do you remember that weird period in the late 90's when tie-dye wasn't cool and it made you look like a throwback 70's weirdo? Yeah... I was that kid. Flash forward to the 2000's and it came back! It's starting to fade a bit in popularity again (to my dismay), but there is a sweet newish trend --Ombre-- that everyone is loving right now. I think these shoes make a great transition for people who love the hand-crafted effect, but have less of a HEY-LOOK-AT-ME-I-JUST-CAME-HOME-FROM-SUMMER-CAMP look.

I will say that the Ombre effect of the black pair is somewhat lost in this photo, but that's what I get for using my old cell phone. Since these pics are about a year old, I can't exactly re-take the photos, but trust me when I say this was a fun and easy craft, and possibly the most useful thing I've ever crafted. I flat wore these out!


Step 2: Fill your dip stations. I kept a little of the undiluted purple aside to do my laces dark. It was just the look I was going for. I left the other pair white. Since the rubber and eyelets don't change from white, you may want to leave the laces white. It's up to you!
Step 3: Dip! There are many different techniques, and since my hands were full, I don't have pictures. Don't freak out about dye getting in the wrong places because either it won't show, like on the insides/bottoms of the shoe, or it won't matter, like on the rubber and eyelets, where it won't stick. There is a lot of individual style and technique involved (just like in tie-dye), but I'll share some of my faves:
- Ombre: submerge your shoe completely under the dye and sing your favorite nursery rhyme, then pull it out a couple of inches and repeat the process until your entire shoe is dyed. Depending on the strength of your dye and the material of your shoe, you may want to time about two minutes between raises. Go shorter times rather than longer, because if you pull a shoe out and it's not the desired shade/darkness, you can just dip it in and repeat the process. It will get a bit darker each time.
- Alternative: Try doing this technique but start with it only dipped half-way up the shoe. Flip the shoe over an repeat for the same amount of time. Your outcome would be a dark-light-dark effect... very cool!
- Dip-dye: I did the "ombre technique: with purple dye, then briefly dipped the toe and heel in the black for a multi-color look.
- Alternative: For a brighter, more colorful look, you could dip one end 2/3 down with yellow and from the other end, 2/3 with blue and you would get a yellow-green-blue shoe!
Step 4: Let it dry overnight. I put mine out in the garage, but at the time I was living in Eugene, OR, where it's rainy and cool and things DO NOT dry overnight. If you live somewhere balmy, throw them out back on a sunny afternoon. Once they're dry (or have been wet for at least 12 hours) toss 'em in your washing machine and follow the directions on your dye packet for rinsing/washing. That's it!

Thanks for sticking with me through this post, I'm a little rusty, but it's great to be back. I would love to hear what you think. I'm going to be posting crafty, foodie, and who-knows-what-else in the near future, so stop back by. Feel free to "follow" so you can keep up with all my adventures. If you enjoyed the tutorial, please share!
[Linked up to: Make It Wear It Thursday Transformation Thursday Under $100 Linky Party
It's a Party Hookin' up with HOH ]
Thursday, January 19, 2012
No Cash Trash Bash: Beautiful Boozy Bookend
 I'm a little pleased with myself right now, so please bear with me. It cost me $0 to make this craft. Absolutely freeeee is my favorite craft budget! I have been stashing all the materials to make this craft for a while, until I finally had everything together.
 All you need is an empty 6-pack. Keep the whole thing: cardboard pack and the bottles. I say keep the bottle caps too, because you know I'm going to come up with something to do with 'em in no time. Luckily, I live with a young man in his 20's and so these are ALWAYS stacked plentifully in the recycle bin and I can have my pick. I highly recommend that you wash these out with dish soap and let them dry for a good long while. I called this a "Boozy Bookend", but let's get real; I do not want my desk or bookshelf to reek of old beer. Gross. To be fair, if you don't have access to beer bottles because you don't drink, you could do the same thing with Coca-Cola glass bottles in a 6-pack, but I don't live in 1954, so they're not readily available to me. I think there are flavored sodas in glass bottle 6-packs at the grocery store, but as I said before the appeal of this craft for me was that it was FREE materials. Deal with it.
 I really don't know what came over me yesterday. One minute I was waking up at 7a.m. to get ahead on homework (confession: I had a post due for one of my online classes at 9a.m. and may or may not have procrastinated a touch.) The next thing I knew, I had done a day's worth of school work in less than two hours and by 9a.m. I had three crafts going an one time! (Look for the frame and magazine pages in upcoming posts) I may have lost my mind for just a sec, but it worked. I found out that my white acrylic paint is alarmingly thin, so I was able to work on other crafty projects between the million or so coats it took to achieve full-coverage.
I use dried roses in this post. These roses from a bouquet I received after my fall were dried for 3ish days before I placed them in these bottles. If you don't know how to dry roses so that they keep their shape and color, comment below and I'll share that. I've been doing it since high school, so I will just go on assuming that everyone knows how to do that.

On to the actual tutorial...
 Step 1: Wash the bottles out. Seriously, this is non-negotiable. Let them dry completely before painting. Step 2: Paint the bottles with acrylic. Thinner gloss paints will require multiple coats (the white took 5 or more for full coverage) whereas thicker flat coats were full-coverage in only a coat or two. The purple was a flat paint, so after it dried I covered with Mod Podge to give a gloss finish and protect the paint. Step 3: Spray paint the cardboard container. I recommend priming with primer or acrylic paint. ESPECIALLY on the exposed raw cardboard on the inside of the container. It just soaks spray paint right up.
Step 4: Once everything is dry, plop them together and stick 'em on a shelf. TaDa!!! That wasn't so hard now, was it?

Linked up at the following parties: Crafty Soiree, Blog Stalking Thursday, Hookin' up with HOH, Show off your stuff party
Thursday, January 12, 2012
Hanging Bathroom Organizer

I bought this block of wood at Goodwill two or three months ago. It was half off, so I paid less than a dollar for it. I just couldn't resist the potential of something clearly crafted with a purpose, but left half-finished. It seemed to speak to me, but I waited until it was practically shouting before I got around to doing something with it. It became a wonderful bathroom addition.


For starters, I purchased a can of spray on primer. I wasn't sure exactly how or what I was going to paint it, but I figured raw wood was going to drink up whatever I put on there. I actually primed it the week I brought it home. It proceeded to sit politely on my shelf and wait for MONTHS to be given a purpose. I finally figured out what I could use it for, and began my attack. I painted it all over a lovely "Tiffany Blue" color. I used E6000 to adhere the tops of three glass jars to the underside (to hold my bobby pins and hair ties). I replaced the too-short rope with a piece of white-ish ribbon. I hung it all up with a "Hercules Hook" which boasts a strength of 50lbs. I am so pleased with how this turned out! I love perusing the shelves of Goodwill for hidden treasures.

Linked up at these parties: Crafty Soiree, Blog Stalking Thursday, Hooking Up with HOH, Show Off Your Stuff
The Victorious Return of Bathtub Laundry
I wrote the following as an entry in my old blog (completely unrelated to crafting) over a year ago. I revisited the idea last night and got my bathtub laundry on. I can't believe it's only been a year since I wrote this post. It feels like decades since I moved to STL to live with one of my best friends in the world. I have a washer and dryer now, and live in Oregon... but after becoming overwhelmed that my comforter wouldn't fit in the washer, I had to figure something out... that's when it hit me: I love bathtub laundry! So please enjoy this little blast from my past (just like I did last night). I'll meet you at the bottom with some more insight from the present.
Wednesday, January 19, 2011
I watch documentaries every day. I am constantly searching to increase my knowledge and expand my world views. I have recently become attached to environmental documentaries because, realistically, we don't have much time left until everyone has to get real about the environment.
I have just moved to a new city and I don't have a washer and dryer in my apartment like I have for the last 6 years that I've lived on my own. While I have used laundromats before, I'm sorry if sitting in a St. Louis laundromat alone all day does not sound like the safest or most entertaining way to spend my day. Naturally laundry has piled up and I just don't have $3.50 a load to spend washing it all.
I was watching one documentary the other day called No Impact Man: The Documentary. I highly recommend it. One tiny little moment in the movie involves them doing laundry in the bathtub. I watched it two weeks ago, and it has remained on my mind since then. I finally decided to do some research and make it happen. There are about a bagillion different ways to do this posted online, and I feel like I've read them all. I have tried a handful of the techniques and cast some out without trying them at all. What follows is what I have devised as the best method to achieve the following goals that I had for doing bathtub laundry:
1. Can be done with only things I have in my apartment.
2. Takes no more time to wash than a washing machine would.
3. Is not a completely miserable experience.
4. Make a significantly lower environmental impact than standard washing machines... just because I can.
Now, I want to establish that the temperature of water I use is based on the materials I'm washing. I use the coolest temperature that can be used but still achieve my cleaning goals. The amount of water I use is based on the size of the load.
Materials:
Bathtub
Dirty Laundry
Laundry Detergent
*Plastic Storage Tub (I use an 18 Gal.)
Bathroom CD player and album "The Sign" by Ace of Base
Step One: Wash
Place the plastic tub in the bathtub. Put a bit of water (no less than 1/4 of the way full, no more than 1/2) and then add detergent. Use much less than you think you'll need. Some places I read said to use half what you would use in the washer, but I found even that was too much. You're wasting far less water and detergent. You will really be surprised at how little it takes to have fresh smelling (and feeling) clothes. Judge based on the amount of clothing and the dirtiness.
Once detergent has been added, stir it in a bit with your hand, just so it's not in a glob. Add clothing. Add the remainder of your water, ensuring that the clothes are good and covered. Some websites recommend filling to the top, but I would only do that with a full laundry basket worth of clothes. just make sure they can be covered by at least 2".
At this point, I like to push everything down and make sure the detergent water has saturated all items. Soak all items for 15-25 minutes. Never soak for longer than 30 minutes because the detergent will begin to break down and damage the fabric and color. When to add bleach? I only do so in my warm whites, which soak for 25 minutes (the longest I soak). I add the bleach 10 minutes before agitation.
This is my favorite part. I kick on my Ace of Base CD and step into the tub. Using a mix of Lucille Ball's moves in the grape-stomping episode of I Love Lucy and Usher's 2010 VMA performance (just sayin'... you should probably youtube it to see the appropriate cleaning methods). The agitation should last 10-15 minutes (or the first 3-4 songs on your chosen CD). You could use your hands to agitate, and I even read of using a NEVER BEFORE USED plunger, but I like the free workout and my back would not appreciate being bent over that long.
At this point, empty the tub of dirty water. I like to squeeze all the water out of the clothes and dump that too. On to step two!
Step Two: The Rinse
With the clothes in the bottom of the tub, fill with just enough water to cover clothing, as cool as you can stand it. Get moving! Agitate again for 3-5 minutes (or one song) and pour out dirty water. Repeat 2 more times. When the water in the tub is no longer getting dingy, you're clean. If your water is still dirty, consider doing small portions of the clothes in the rise tubs. You used too much detergent. It's okay, just keep rinsing (even use running water if necessary) because while your environmental impact is going up, you have to get that detergent out or it can deteriorate and damage your clothing.
Step Three: Dry
Squeeze out as much water as possible, then hang the items to dry. Using plastic hangers (wire hangers will rust and cause me to scream "no wire hangers! EVER!") or a dry rack, hang the wet clothing. I use hangers hung on my shower curtain rod.
When they're dry, you've succeeded. Congratulations.
Here are some helpful tips I discovered and read about along the way:
-I use the storage tub to reduce the amount of water I use, but for bulky items such as jeans, towels, and sheets, using the entire bathtub is more reasonable.
--Do towels last so that you can use your dirty towels to cover the "splash zone" in case you get too much Lucy action and not enough Usher. I like to leave them under the clothing that's hanging to prevent water from dripping on the floor then as well.
---I have read of using a fan in the bathroom to hasten dry time. I'm patient, and just let them hang overnight. (although, for folded over pants or jeans, I do flip them right before bed.)
----To knock out the stiff hanger feel, I go over clothes with a blow dryer for just moments to warm them and make them more malleable.
-----I read that to shrink denim back to it's correct shape, you should soak in VERY HOT water for 5 minutes after your rinse is complete, before hanging. I didn't find this until after I had done my jeans though, so I'll try it out next time.
Best of luck if you choose to try this out yourselves. I would love to hear your questions, comments, or experiences.
Back to the present: Now since I do have a washer and dryer in my current home, I decided to just toss the comforter in the dryer. I did not feel like dealing with hanging a sopping wet comforter over some furniture, so that's just that. This was one of my favorite posts that I wrote on the old blog. What do you think? I may have to get back into doing the occasional load this way. I am constantly running across recipes to make your own detergent on blogs, which would be another great way to minimize chemical pollution and waste. So there it is, the return of bathtub laundry.
<3 Clean Stephanie
Subscribe to:
Posts (Atom)